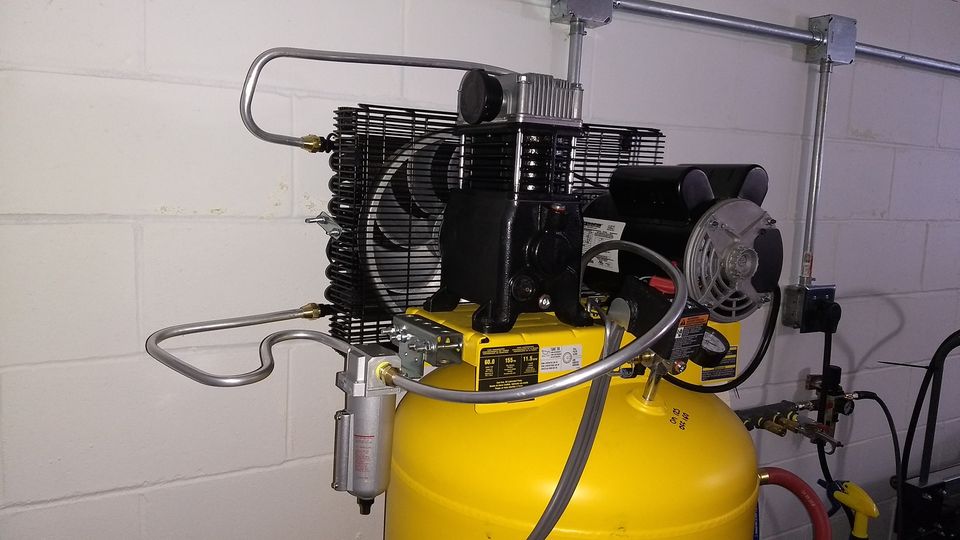
I looked for many ways to get dry air from my compressor and settled on a homemade aftercooler. This compressor is branded as so many brands as you’ll see in the video even if mine is branded dewalt/Husky/other as the000 generic 60 gallon model that is dewalt. The refrigerated dryer for dry air are great, but I need to install another dedicated power outlet to use where my compressor is and needs to drill through a concrete wall so it’ll be a little while before I get to it. Instead, I went the cheaper route for the DIY aftercooler for my air compressor to help in how to get dry air.
I list out TOOLS, PARTS, AND a little of HOW TO PUT IT TOGETHER!
For painting, plasma cutter, baking soda blasting, or giving tools a longer life this setup has been used for years as one of next best things to an air compressor refrigerated dryer. This has helped me in how to dry air better for cheap on my 60 gallon air compressor. This is a husky/dewalt tank and DIY info to make a homemade aftercooler but works on so many models! I’m setting up my MINI metal machine shop in a very tight space and need to have everything as tiny as possible to still be able to fit a vehicle in the garage over winter. mini machine shop: dry air aftercooler for 60 gallon air compressor – this is the DeWalt/Husky/etc air compressor.
There ARE small differences between them for setup so please keep that in mind. Video primarily was for helping people to find out how to get the fittings on and a clean look to it. These are parts I ordered that could be hard to find on your own search. Check that the name I put matches the actual part – I’ve noticed other videos from a couple years ago link to who knows what parts that did not fit for me.
You do NOT want kinks in your line! Bend SLOWLY! Lube your tools for flaring and bending properly!
*Imperial Tool 370FH Triple Head 180 Degree Tube Bender, 3/16”, 1/4”, 3/8”, and 1/2”
https://www.amazon.com/Imperial-Tool-370FH-Triple-Header/dp/B002P8UUD2
Check the size line you need before ordering – this line comes in multiple sizes. I used 1/2″ OD size to match the DeWalt 60 gallon air compressor shown in this video *Allstar ALL40185 1/2″ Diameter 25′ Aluminum Coiled Tubing Fuel Line
https://www.amazon.com/Allstar-ALL40185-Diameter-Aluminum-Coiled/dp/B006K8JJN0
These little packs vary in price – check around for different prices as they flucuate. Also, you will need to put backings on these so they don’t slip through the radiator tubes… basically I’m saying they’re not wide enough and make a spacer. *Fan Mount Kit
https://www.amazon.com/Upgr8-Universal-Through-Radiator-Plastic/dp/B07L53QDVD
*Derale 15300 Tube and Fin Cooler
https://www.amazon.com/Derale-15300-Tube-Cooler-Core/dp/B004XONT3E
*1/2″ Heavy Duty Particulate Filter Moisture trap water seperator w/Auto Automatic Drain
https://www.amazon.com/Particulate-Filter-Moisture-seperator-Automatic/dp/B017GIGQOC
You will need a flaring tool. These can be purchased locally or online – search “Flairing tool” and you should get some good results to choose from.
Everything in this video was 1/2″ OD measurements. You should be able to get these at any local supplier. I am not putting links because I went through others links and don’t know if they changed but did NOT get the right parts. Please search these terms. If you need further help, please throw a comment in the video and I’ll look to help. 🙂
I used Brass on:
1/2″ OD Compression nut
1/2″ OD Compression Sleeve
1/2″ OD Flair nut 1/2″
OD Flair to 1/2″ MIP connector
Yellow PTFE Thread Sealing tape
Ace 1-1/8 in. Tubing Cutter Item no. 45222 | 88-1391A